
PPS drooling: Material seeps after ten minutes of stoppage. How to maintain 150°C mold temperature?
问题排查16 min read
On this page
PPS film typically appears after a 10-minute material hold. On the first shot following startup, a thin layer of material surrounds the gate, showing an uneven glossy surface under side lighting.
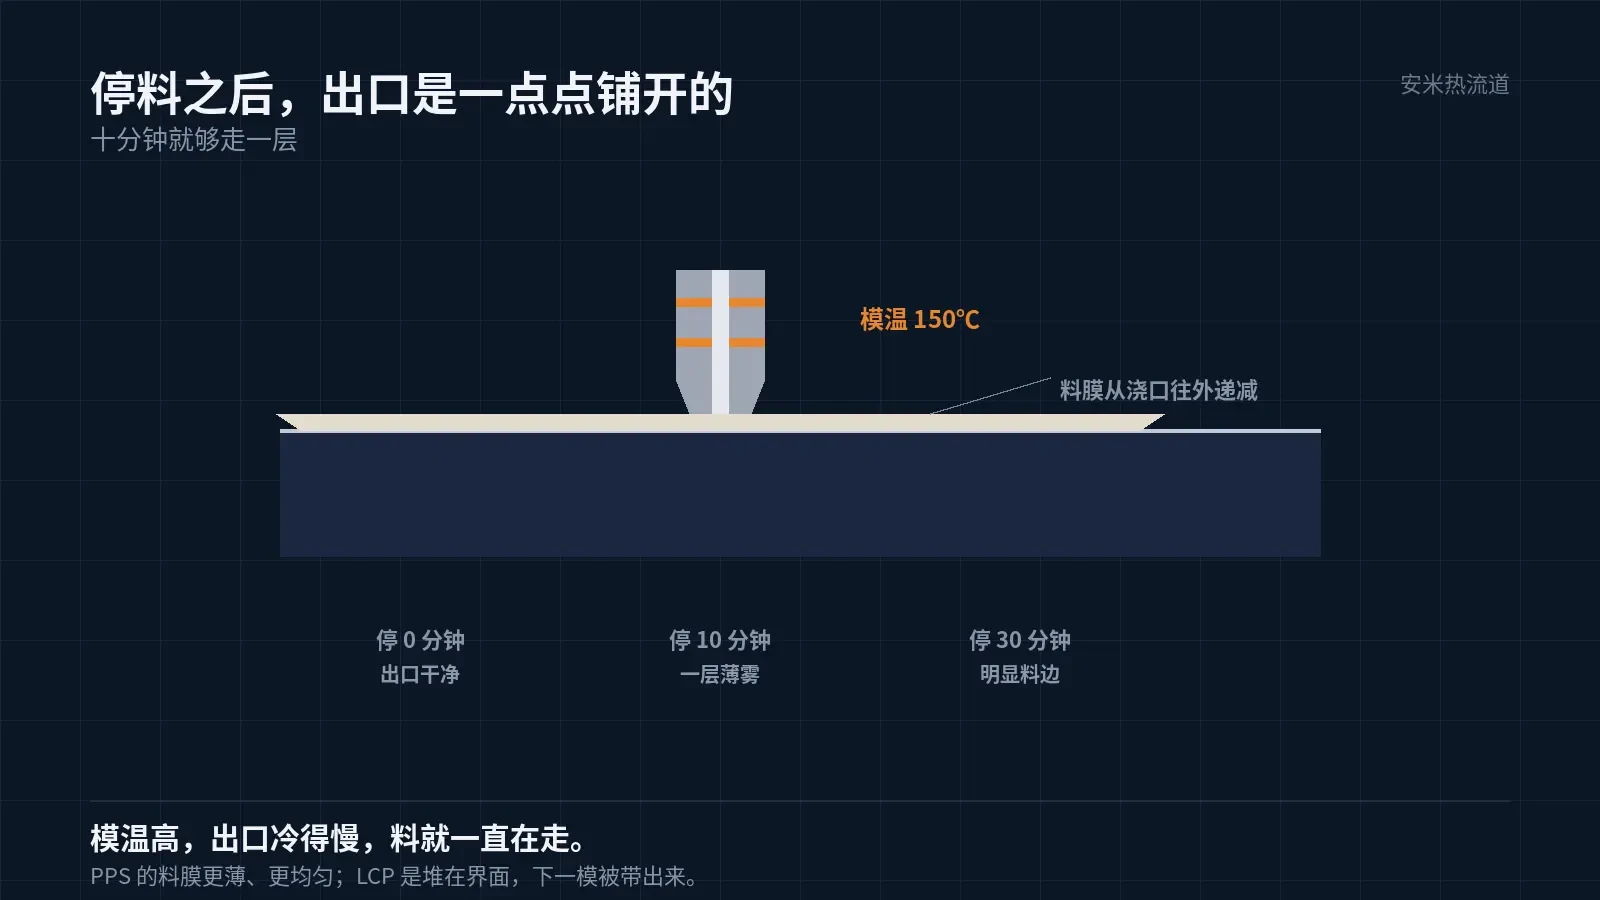
On molds with a mold temperature of 150°C, the outlet cools slowly, allowing sufficient time for the material to flow out during the hold phase.
What Happens in Those Ten Minutes
After holding pressure ends, the screw stops and the injection molding machine releases force. The hot nozzle tip remains energized, maintaining material temperature near 310–320°C at the outlet.
Unlike PA46, which tends to drool, PPS film is more uniform, thinner, and covers a larger area. PA46 film is thicker with rounded edges and often shows slight silver streaks. These morphological differences require distinct handling procedures.
PPS has low viscosity and excellent thermal stability, so it does not thicken on its own. Gravity combined with residual pressure in the runner is sufficient to cause slow seepage from the outlet.
Residual pressure magnitude depends on holding pressure settings and runner structure. High holding pressure and long runners slow pressure release, maintaining higher outlet pressure for longer during the hold. Consequently, seepage volume can vary significantly between molds even with the same 10-minute hold time.
A mold temperature of 150°C makes this harder to avoid: the small temperature difference between the nozzle tip and the mold causes the outlet's outer side to cool slowly. The seeped material does not freeze quickly and continues to spread across the cavity surface.
Longer hold times increase seepage. A 5-minute hold creates a thin mist-like layer, while a 30-minute hold produces visible material edges.
Differences from LCP
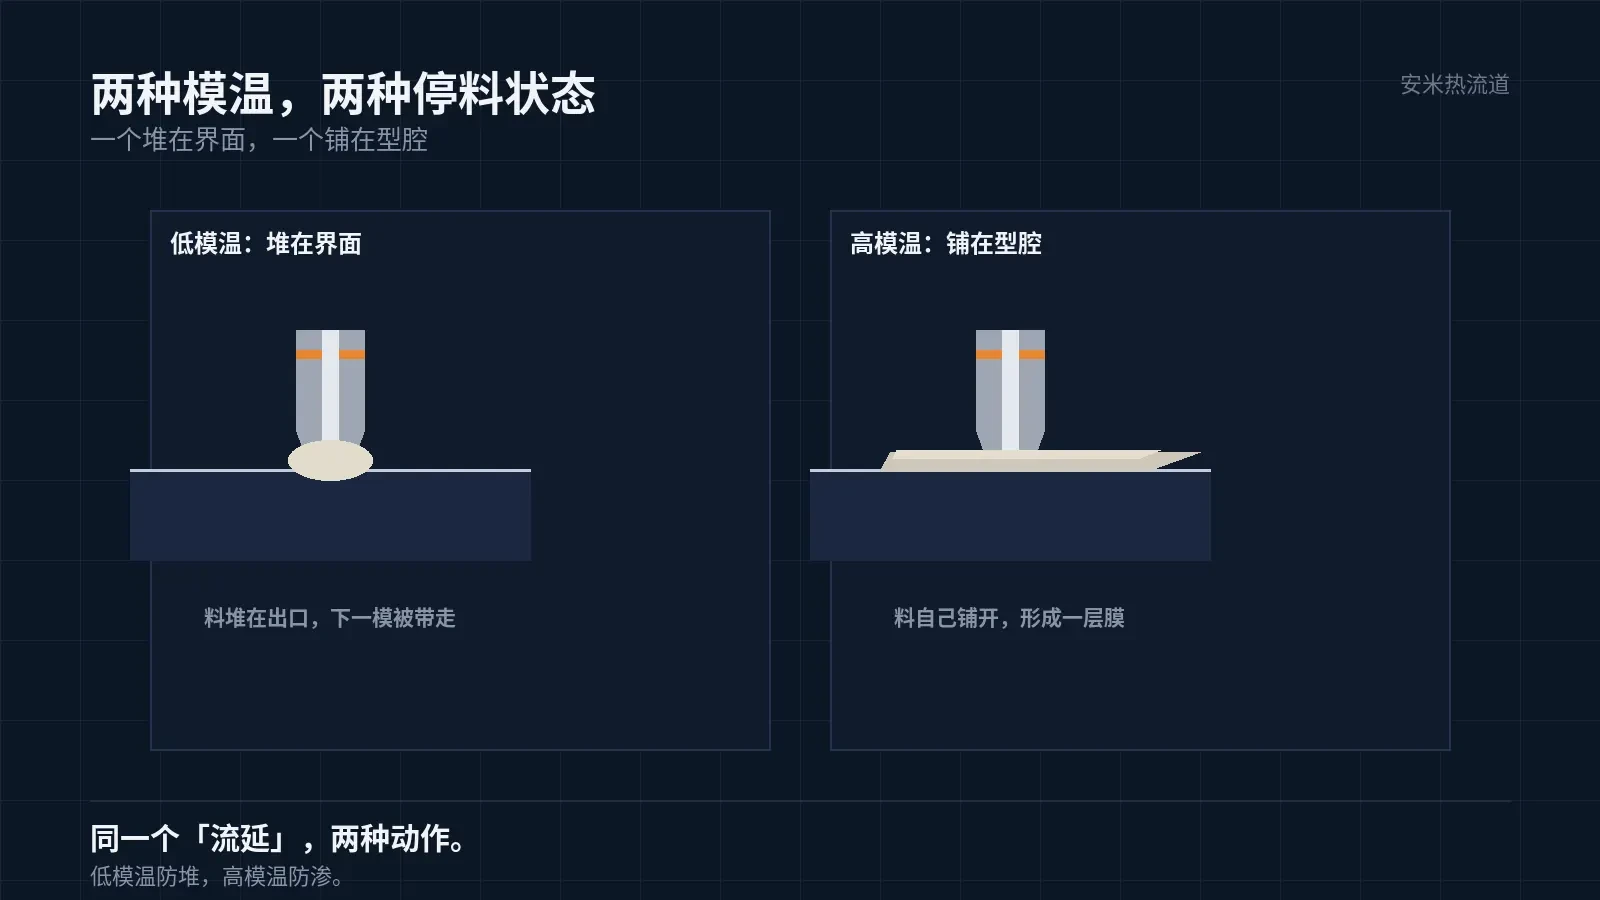
LCP mold temperature is 80–120°C, causing Fast Cooling at the exit. When feeding stops, melt accumulates at the interface. Although no leakage is visible, this accumulated layer is fully pulled out during the next shot.
Comparing the values: LCP mold temperature is 80–120°C, PPS is 150°C, a difference of 30–70°C. This gap reflects the different heat dissipation rates at the exit and explains why the two materials behave differently during feed stop.
PPS presents a different scenario: it flows directly onto the cavity, spreading the discharged melt. As a result, the PPS melt film is typically thinner, more uniform, and covers a larger area.
Handling methods also differ: prevent accumulation for LCP, prevent seepage for PPS. The same term implies two distinct actions.
Dry per manufacturer specifications
PPS pre-drying requires 140°C for 3 hours or 120°C for 5 hours. To prevent bridging, use 105°C for 5 hours (DURAFIDE technical data).
Insufficient drying causes bubbles, silver streaks, and reduced strength—not material film. Misdiagnosing material film as a drying issue prevents resolving the root cause.
Another common on-site error is confusing material film with mold oil. Mold oil forms a uniform layer with smooth edges, while material film thins out from the gate and has irregular boundaries. Side lighting enables immediate differentiation without equipment.
Inspection sequence: First check the actual dryer temperature, then the drying duration, and finally verify if the hopper material was changed. Only suspect the material itself after confirming all three items are normal.
However, both issues often occur together: a material film with silver streaks and whitening near the gate indicates problems with both drying and outlet temperature. Resolve the drying issue first, then address the temperature.
Manufacturer Guidelines for Extended Shutdowns
The manufacturer specifies that purging is required during extended shutdowns and that the barrel temperature must be reduced below 280°C. This procedure effectively prevents drooling.
Practical implementation: Purge before shutdown, lower barrel temperature, and maintain mold clamping pressure. Upon startup, heat to set temperature, run several dry cycles until the gate is clear, then begin production.
The color change sequence is the same: purge, verify no residue at the outlet, run several dry cycles, then start production. Reversing this order causes residual material to contaminate the initial shots, resulting in the most visible film.
Choosing between cleaning granules and regrind requires care. Regrind flows differently; if the nozzle tip temperature isn't lowered during passage, residue sticks more easily to the outlet. Starting immediately after cleaning causes the first shot to carry adhered material into the cavity.
A Frequently Overlooked Detail
Adjust the screw-back position. Excessive retraction creates space in the runner, allowing melt to drip under gravity; insufficient retraction slows residual pressure release, causing overpressure stringing in initial shots.
Record the screw-back position as a scale mark or stroke count on the machine card. Refer to the card during shift changes instead of relying on memory.
Add a field to the handover log for actual results: downtime duration, procedure used, and initial shot status. After one month, the correlation between downtime length and procedures becomes clear.
Do not unclamp the mold during shutdown. Opening and closing the mold changes cavity temperature, altering fill conditions for the next shot.
For shutdowns longer than one day, remove and clean the nozzle tips before reinstalling. Heating without disassembly causes deep-channel material to melt slowly, resulting in poor initial shots and batch-wide contamination.
For PPS stringing, check downtime first, then mold temperature, and finally drying. An incorrect sequence renders parameter adjustments ineffective.
Send shutdown records, mold temperatures, and material grades. We will verify against gate section temperatures and provide pricing once the solution is confirmed.
Calculate downtime from the last injection to the next injection, not from when the shutdown tag was posted.
Print this instruction on the back of the shutdown tag for operator visibility. This is more effective than filing it in cabinets.
MATCHED BY MATERIAL AND DEFECT
The article covers gate marks or residue on cosmetic surfaces; check VG for a flush break and pin maintenance.
Register for a selection review and quote
Submit part, mold, and material details. Our engineers will evaluate the gate solution per part and provide a quote.
Upload a 2D layout drawing using the form.
Online selection and quote
Scan to register